Do-it-yourself coffee roasting

Forever on a quest to make extra work for myself, I’ve taken to roasting my own coffee. Why? Well, there are a few reasons. First off, it’s fascinating to take the raw material — green coffee beans — and in less than 10 minutes, turn it into what we’re used to seeing in stores. Second, freshly roasted coffee has a taste that just can’t be beat. If you were to compare top-quality beans that were roasted with the most professional equipment a month or two ago with average-quality beans that were roasted yesterday in a pan, well, the latter would win.
Simply put, freshness is key. Unless you’re buying your coffee straight from the roaster, and using it all immediately, those beans you bought probably aren’t the freshest. Plus, when you’re roasting your own coffee, you decide how much to prepare. It’s unlikely that your coffee guy will agree to sell you 30 grams of beans at a time, for instance.
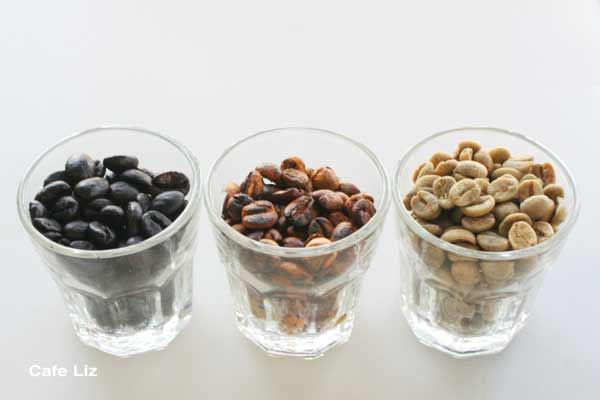
In the photo is the before, middle and after — the small, unroasted beans on the right, the somewhat unevenly browned beans I stopped mid-roast in the center, and the dark, glossy final product on the left, because I like my coffee super-dark. So how do we get there?
Green coffee is the bitter, dried pit of a fruit. The roasting process dries it out and caramelizes some of the bean’s sugars, which gives the coffee its desired flavor. In the process, the bean expands, sometimes to twice its original size (note how small the green beans are in the top photo). Post-roasting, the bean continues to emit carbon dioxide.
Professional roasters heat their beans with hot air, in order to get the most consistent results. While you can purchase a coffee roaster or use a popcorn popper, the most simple method involves a dry pan and a burner.
I use a thick-bottomed, non-teflon pot, deep enough for me to shake the beans as they roast — once they start getting hot, you need to keep them in constant motion so they don’t burn. I found that stirring with a spoon isn’t enough, so I firmly grip the pot handle and shake constantly, as if I were roasting pine nuts or almonds.

How to roast
First off, open all the windows, close the kitchen door, and turn on a fan if you have one. The beans emit a lot of smoke as they roast, partially because the outer chaff is burning away. Try not to breathe the smoke.
Take out a metal mesh strainer to cool the beans once roasting is done.
Pour some beans into a thick, non-teflon pot. I roast a maximum of a two- to three-bean thick layer at a time; otherwise, it’ll take a long time to roast.
Put the pot on the maximum flame possible. When it begins to heat up, grip the handle and start shaking the pot a few centimeters above the flame, as if you were flipping pancakes — keep the beans moving in a circular motion. Every once so often, put the pot back on the flame to keep it nice and hot.
As you’re heating the beans, you’ll hear two kinds of sounds — when the beans are just beginning to brown, you’ll hear what’s known as “first crack,” a loud, assertive popping sound that occurs when the beans are between 195 and 205 degrees Celsius (380-400 Fahrenheit). The beans in the middle cup were taken out of the pot around the first crack stage.
A short while later, the beans will begin to emit a gentle crackle, the “second crack,” which occurs at 215 to 225 degrees Celsius (415-435 Fahrenheit). You’ll probably hear a mix of the two cracks, since pan-roasting isn’t the most consistent method.
After the second crack begins, you can stop roasting at any point, depending how dark you want your beans. Different color roasts have different flavors, and this chart breaks down the different colors. I generally like mine as dark as possible — very shiny, and nearly black. They even look black in the photos. This is great for espresso, and in cappuccinos.
When the beans are as dark as you want them — keeping in mind that they’ll continue to roast a bit even after you take them off the flame — dump them into the metal strainer, and shake to cool. The burnt chaff should fall through, so do this over the sink or outside. Then, set the beans to cool — I put the strainer in my windowsill — leave the kitchen, and close the door until the smoke dissipates.
The coffee is said to be best about 12-24 hours after roasting. It should be used within a week.

Where to buy green coffee
Finding green coffee is quite easy in Israel — most of the small roasters sell it. I buy mine at the Atlas spice shop (in the photo below), at 49 Levinsky Street (in the Levinsky Street market), where I also buy roasted coffee. The Atlas people have several kinds of beans. The Brazil, for instance, cost me 24 shekels a kilo.
I know that many of the roasters in the Carmel Market, such as Stern’s, also sell green coffee. Israel does not lack for small coffee roasters.
You can also order green coffee beans online. I found beans from Colombia, Guatemala, and a 10-bean sampler on Amazon, for instance.
Plus, you can get a large quantity of beans at once, because green coffee keeps for years — like other kinds of beans.

Preparing the coffee
Grind the coffee when you’re ready to use it. We used to make ours in a moka, until our cousins bought us a fabulous Breville espresso machine.

More information
The Seven Bridges brewing cooperative has a fabulous guide explaining the entire process, including a chart of the different flavors the bean is supposed to have when roasted to different stages.
Wikipedia has a very thorough entry.
Doram at Haaretz addresses professional roasting equipment.


